JIRA-ClayHR Integration
ClayHR’s integration with JIRA allows you to sync the creation of “Projects”: when you create a “Project” entity in ClayHR, the system syncs and automatically creates a “Project” entity in JIRA
You can easily integrate your ClayHR cloud instance with your Atlassian Cloud instance.
I. Linking JIRA with ClayHR
- Setup JIRA in Third-Party Integrations
- Go to the top right “Setup” menu and scroll down then click on “Third Party Integrations”: Setup-> Third Party Integrations.
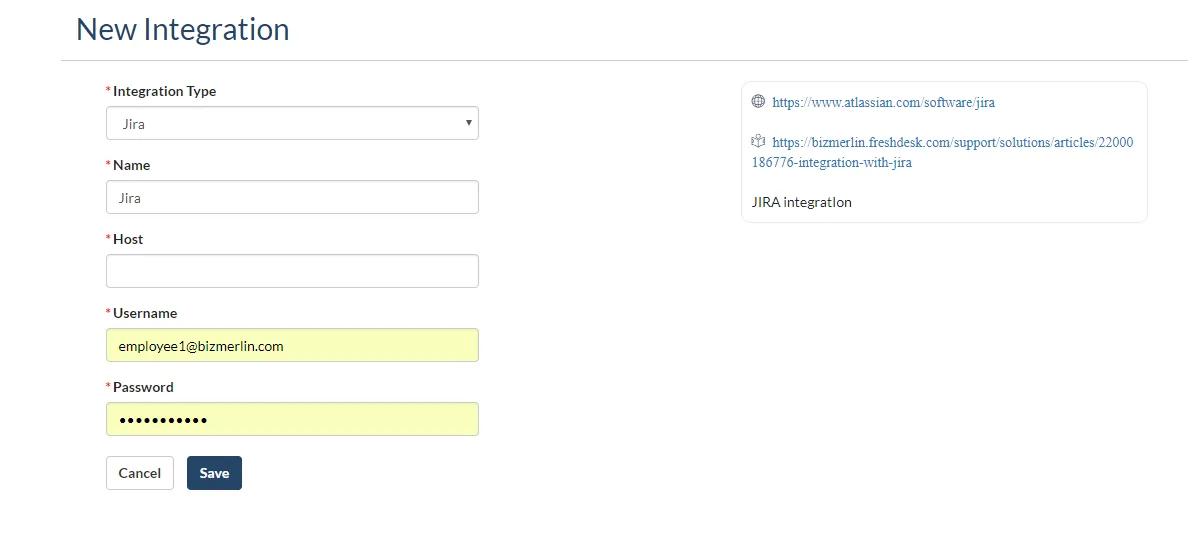
- On the Third-Party Integrations page, click on the button “Add New” and choose “JIRA”.
- In the field Host specify your JIRA account URL (the address of your Atlassian cloud site). For example, if your Jira dashboard is at https://ACME.atlassian.net/secure/Dashboard.jspa then the Hostname should be https://ACME.atlassian.net
- Fill in your Username in the field Username and Password in Password field.

Now, you are ready to Integrate with JIRA.
2. Add JIRA function in Post Functions
- Go to the top right “Setup” menu and scroll down and click on “Third Party Integrations” and click on “Post Functions”: Setup->Third Party Integrations-> Post Functions.
- On the Post Functions page, select Object as “Project” from the drop-down, JIRA integration configured in section 1 (Setup JIRA in Third-Party Integrations) from Third-Party Integration drop down as well as “create-project” from Function drop-down with field mapping in given Text Area.
- Click the “Save” button to save Post Function.
- You can see the selected Post Function in the table on the same page.

Now, you are ready to create a project in JIRA, whenever you will create a Project in ClayHR.
II. Automatic JIRA project synchronization with ClayHR Project
ClayHR-JIRA integration allows you to sync the creation of “Projects”: when you create a “Project” entity in ClayHR, the system syncs and automatically creates a “Project” entity in JIRA.
Creating New “Project” in ClayHR and syncing with “Projects” in JIRA
- In ClayHR, go to the top menu “Allocations” and click “Projects”.
- Then you can see a list of all your Projects with ClayHR. Click on the “New Project” button on the top left corner of this page.
- Fill in the required fields and click the “Save Project” button. Your project will be created in ClayHR as well as JIRA.
Pulling “Projects” in ClayHR from JIRA
- In ClayHR, go to the top menu “Allocations” and click “Projects”.
- There you see a button “Pull from JIRA” on the top right.
- Click on the button. All JIRA projects will be created in ClayHR.
- Finally, you will see a notification message on the screen.

Note: The JIRA User specified in the Third-Party Integrations setup will become the Lead of the Project in JIRA.
Failure Conditions
- You must specify Username instead of Email used to login into your JIRA Account.
- If you specify Email id then Project creation in JIRA will fail.
- You must specify the correct Username and Password of your JIRA account.
III. Update expense/invoice
This is not currently supported. If your want to modify Project details, you need to modify them directly in JIRA.


